Definition
Laboratory apparatus commonly uses Bunsen Burner. A bunsen burner is named after its inventor Robert Bunsen. It provides heat, sterilization, and combustion in the laboratory. As the name implies, the bunsen burner has six main components: a barrel, a collar, air holes, gas intake, gas valve, and stand. It produces a single open flame.
Bunsen Burner Parts
As one of the most important pieces of lab equipment, it is mostly used in the laboratory to heat different materials. In order to heat glass test tubes or other liquid-containing materials using a continuous flame, it is set beneath a support stand that holds a mixture of gasses. It consists of six major components:
Bunsen Burner Diagram Example
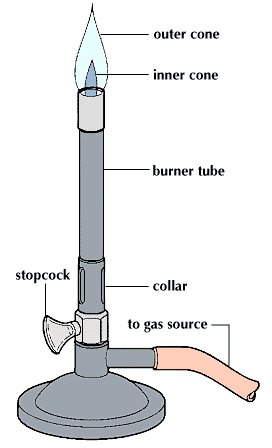
Bunsen Burner Parts
The different parts of a Bunsen burner include:
- Barrel: vertical metal tube connected to base
- Collar: connects the barrel to the base
- Air holes: present in the collar and allow adjustable flow of air into the gas mixture in the barrel
- Gas intake: connects to the gas source at the lab bench via a rubber hose
- Gas valve: regulates flow of gas
- Stand/base: used to set the burner on the bench
Bunsen Burner Functions
Upon connecting to a source of fuel, an initial step is to open the air holes. When you close the air hole, a yellow wavy flame will appear called luminous of coolest flame.
The air reacts with the entering gas and produces a blue or non-luminous flame at the one-third ratio. The non-luminous flame is generally preferred due to its high, controllable heat output compared to the luminous flame.
This flame also does not produce soot or smoke. Working with a burner is inherently risky, so safety precautions, such as adhering to lab safety regulations, should be strictly followed. In the event of a danger or accident, students should be promptly referred to first aid treatment.
Parts of a Bunsen Burner Types
The Bunsen burner produces two types of flames, namely the luminous flame and the non-luminous flame. The glowing flame is the coldest part of the flame, while the non-luminous flame is the hottest part of the flame.
- Binomial Nomenclature: Define With Examples
- Carbohydrates: What are Importance and Define Its Classification, & Function
- what are proteins and their function in the body Define Its Structures, Importance